Quantcast
Channel: Caleb James Chairmaker Planemaker
Viewing all 123 articles
Browse latest View live

Drilling - Post and Rung

$
0
0
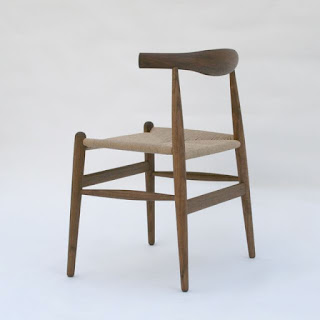
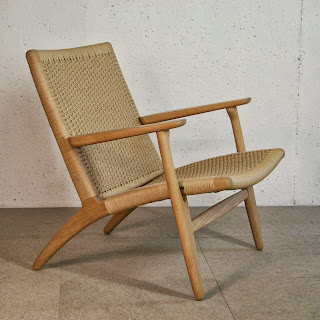
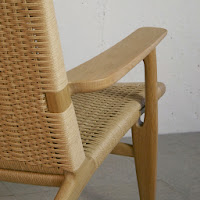
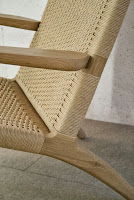
Yet more on drilling... Lets look at how I approach drilling for a Danish Modern chair frame. Naturally the tooling that was in vogue during the time a chair was designed and produced will often suit the production of that style the easiest even if other means are developed later on. I find that especially true of windsor pieces. That is why I will do almost all drilling free hand on those pieces but for the Danish Modern pieces most holes will be done on a drill press or even slot mortiser. I will cover the latter method in a future post, which is a must have tool for Wegner designs.

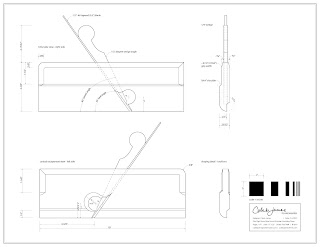
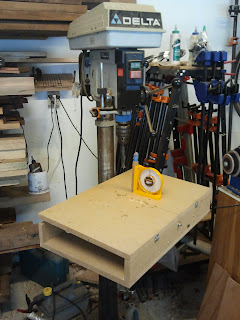
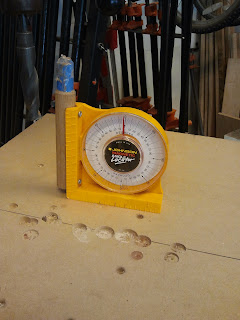
So lets look at my drill press set up. I use a jig that without would otherwise make drilling a post and rung chair a real fumbling awkward mess. I have seen a number of descriptions of ways to do this but none that don't require something that is specific to each chair design. This jig is just a platform that I can set a specific angle on. It will drill anything from 0º-25º.


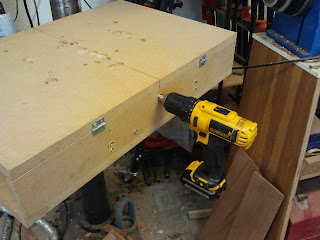
Here is how it works. A round dowel is drawn forward or backwards by a treaded shaft. The dowel makes contact with an angled bracket pushing the platform up or lowering it.


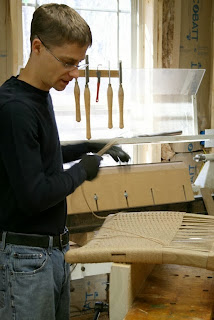
I use a cordless drill to drive the shaft, for the sake of speed. 


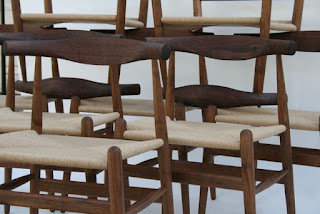
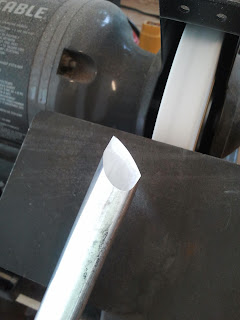
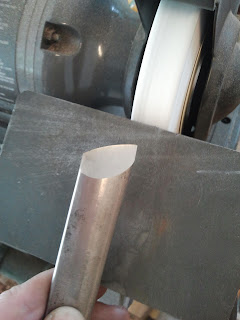
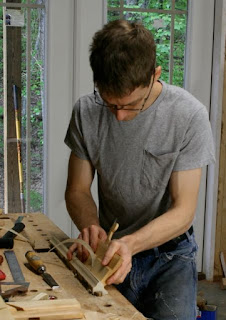
Here are a few photos of a post beginning prepared to drill. The pictures are pretty self explanatory on the order of set up.


The angle is set by a simple gravity/plum bob type angle gage that you can purchase at any home improvement store. I compare the chuck or bit angle to the platform and just adjust the platform to the angle in relation to it.


 I use an additional platform with a "V" groove to hold a round part stationary. Square it to the platform edge. Add a clamp to hold it still. (not shown)


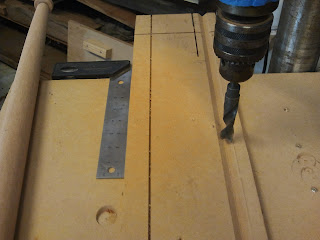
Center it on the groove.


Drill!


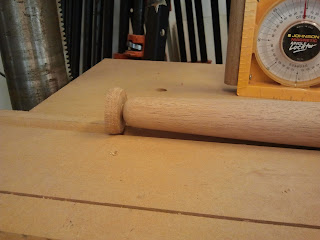
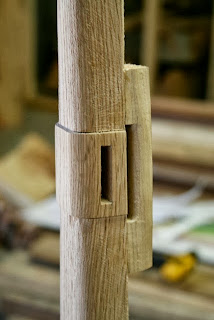
For posts that are tapered, leave an end on your turning that is equal to the diameter of the largest portion of your turning. This will allow you to base your angle of the hole being drilled on the center line of the part rather than any angled taper.

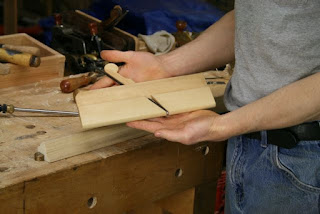
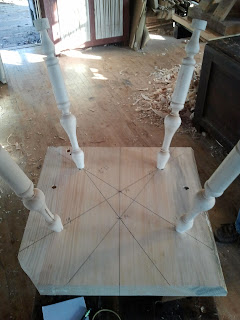
I will almost always start by drilling the front and rear post and assemble a right half and a left half of a frame. Then follow by drilling the remaining holes on one of the assembled halves at a time then complete by mortising or drilling for the back rest/supports. Now assemble the two halves into a whole. Doing it this way makes the assembly more accurate than trying to drill all the holes and then assembling. 

This is the simplest most versatile method I have come to use so far. I will follow up with some discussion of how you can use this jig in connection with sighting angles to drill compound angles. This is really useful for drilling the holes in the back of an elbow chair or something similar.


Wegner, Walnut, and Paper Cord

$
0
0
I have been quite busy and away from my posting lately. These chair have kept me quite busy. I had a set of ten to do and they are completed and shipped off to their new home. 

That said, I am in my new home as well. I almost went as far as these chairs did, Charleston, SC, but I stopped in Greenville, SC. That is of course my new residence. I finally am all in and back to work. 

Now that I am back at it, I have a new chair design that I will be showing off soon, I hope. I will be doing a lounge chair in the CH25 style as well. I look forward to talking about all that weaving. 


I love how the light creamy colored weave stands out on this walnut frame. I really enjoyed seeing this come together. 


I can't seem to help myself when I finish a group of chairs. I just want to stack them and see what kind of geometric shapes come to life. I guess I also am just getting a feel for how I might place them together when I pack and ship them. Who knows what drives these things.


Beech Wood for Planemaking

$
0
0
Could I have bought a bigger log? I think not. When you ask a mill to cut a particular type of tree for you you better specify the size, I guess. You live and learn. Beech is so seldom cut in our forest that I think the feller was just itching to drop a big one. He probably was saving this one for just the day that someone asked for a beech. 


So I never ended up making it home with this one. This is a 18-1/2' log. It measures 31" on smallest end. I didn't get far down the road and decided to give a friend a call to see if I could park it at his place and come back and cut it up later. I had a 2 1/2 hour drive through the mountains of TN so I wasn't feeling comfortable. This log had to of weighed easily more than my truck.

Anyhow this is where I will be getting wood dimensioned properly for solid wood moulding planes. I need it perfectly quarter sawn so I will be riving this up just like windsor chair parts. You can't get any more quartered than that. 

After some time drying I will be up and running. I hope to ease the pain of others that have been looking desperately, like me, for proper wood. I don't have prices yet but I plan to sell moulding plane blanks. I already have some awesome curly hard maple drying for some specialty plane bodies.

If you need beech wood for moulding planes let me know and I will put you on my list. I will have larger plane bodies as well for Smoothing, Jack and Jointer planes.

Just for fun I will post some photos of me splitting this up. :) I need a bigger saw...ugh!

Free Wooden Rabbet Plane Plans

$
0
0
So in the spirit of getting everyone in the shop and cutting up some wood I decided to post up a measured drawing of a 3/4" wooden rabbet plane in the 18th century style.

It is all wood with the exception of the blade which is easily gotten from Lie-Nielsen here. It features a conical escapement and some simple embellishments that a hand plane, chisel, and #7 sweep gouge can handle.

The plans are basic with a few things that can be easily changed if you like. Such as the bed angle is shown at 55˚, for hardwoods, but could be 45˚or 50˚or even 60˚. I show boxing on the plane but it is of course not a must especially if you are using a hard wood like beech in the first place but it will increase the life of the sole for a heavy user if you decide to add it. And of course you can increase or decrease the width.

I only have one request and that is if you want to post these anywhere else online please link back to this page/ post. I offer these as a free download but they are not intended for commercial use. Again please limit the use of this design to your personal use and please don't be silly and try to sell them on Ebay. It is FREE! and it is © copy right protected.


CLICK HERE TO GO TO THE DOWNLOAD PAGE. (Click on the download button in the upper right corner of the new page to begin download.)

Have fun ya'll!

NOTE: The plans are in PDF format. If you don't have a PDF reader Adobe Acrobat is a free software that will make it viewable and printable. The plans are 11"x17" and any print shop can print this or just print it in two pages on your home computer. Make sure where ever you print it that the "scale" is set to 100% or the measurements won't be accurate on the print.

If I made any errors anywhere in the plans please let me know so I can update them.


UPDATE: 3/25/13
Hey all, I for some reason I noted 1” where it should have been 3” on the drawing for the mouth location along the sole of the plane. The drawing is still correct but the stated length was a typo. I corrected it. The updated version has a title ending in 3/25/13.
That is what I get for editing my own work. Sorry. Download again if you are in doubt otherwise the error should be very obvious and the physical measurement otherwise is correct either way.

Comb Back Windsor Arm Chair Plans by Curtis Buchanan

$
0
0
So finally they are ready! What are they? These are full scale drawings of Curtis Buchanan's comb back windsor arm chair that he made in his Youtube video series. If you have ever wanted to make one of these now is your chance to have all the details in a truly refined design.


These plans are not simply a "rough" design of the original. I took every effort to show exactly how his chair looks once completed. These are not plans intended to "simplify" the making of a really great chair design for the novice woodworker. (These drawings won't talk down to you) They are for those that want to challenge themselves and make an heirloom piece. 

We truly feel that no detail is left out. I worked with Curtis for over a year, on and off, working on these to get them just right so that they as useful and as detailed as possible. 


Here is a Youtube video of Curtis talking about the plans, the DVD, and topography map of the seat that Jake did. That map is so awesome and really completes these plans. 

There are more to come. Watch for the continuous arm chair version that we hope to have completed in the coming months. For now go to Curtis' website and purchase these. I don't stand to profit from these (disclaimer). However, I simply wanted to work with an awesome craftsman and learn from the best while doing my part to make the sharing of this craft open to others. Your support will make it possible for more plans to come.

Free Wooden Smoothing Plane Plans

$
0
0
So here we go again. It looks like you folks are having fun making some wooden planes so lets add to the fun. Here is a great little coffin shaped smoother for your collection. This is a fantastic size and a great introduction to making a wooden bench plane. The construction of the parts is a very typical arrangement and the size of wood needed to make this is much easier to find.

Here are the plans in several different layouts. The download has four pages. First one is for shop reference with measurements and lays out everything logically but not intended to be to scale. The second is for printing to scale all on one page but is on a large standard size paper of 11" x 17". The last two pages are for printing to scale on your home printer paper of 8-1/2" x 11".


As with other free plans I offer, I have one request and that is if you want to post these anywhere else online please link back to this page/ post. I offer these as a free download but they are not intended for commercial use. Again please limit the use of this design to your personal use and please don't be silly and try to sell them on Ebay. It is FREE! and it is © copy right protected.

CLICK HERE TO GO TO THE DOWNLOAD PAGE. (Click on the download button in the upper right corner of the new page to begin download.)

NOTE: The plans are in PDF format. If you don't have a PDF reader Adobe Acrobat is a free software that will make it viewable and printable. Make sure where ever you print it that the "scale" is set to 100% or the measurements won't be accurate on the print. You may need to unselect "fit to page" when printing.

If I made any errors anywhere in the plans please let me know so I can update them.


What is the Diameter of Danish Paper Cord?

$
0
0
Wow, what a question. I have been asking that for a long time. What is its actual diameter. I think I may have figured it out finally.

The root of the problem of nailing down the exact diameter probably lies in the fact that it was originally an industrial product made to bind things. Anything and everything. It wasn't meant to meet a particular exacting standard (as far as I know of). This product just so happened to make its way into Danish modern chair production because of a number of reasons.

Despite this, as far as I have experienced, there is an amazing consistency in size from roll to roll and from different suppliers, though I now primarily source it from one company in the US.

I used to use a rough figure of 7 cord widths per inch. This works for anything less than 3" but anymore than that and it becomes clear a more accurate measurement is needed. Here is where it gets ugly. There is no easy measurement that fits. It doesn't even make a clean round number in metric.

It is somewhere between 1/8" and  9/64". Or somewhere between 3.5mm and 3.6mm. I have landed on the figure of 0.13875" or 3.52425mm. It is close to 31/32" for 7 cords which works ok for figuring the nail locations on a 5/2 cord layout.

Since this figure is awkward to work with in the shop for laying out cord and nail locations I made a ruler for simplifying the process and of course want to share it with all of you.


Don't be confused by all the little blocks. There are instructions on how to make a ruler with the print out. It is designed so that you can create a two sided rule and be able to pair it with the different standard ratios of cord layout used on most danish modern chairs. 

It is sized for printing on standard 8.5 x 11 paper. The rule is 10" long and can be made longer by butting pieces end to end. I suggest using some clear plastic tape to laminate it with to create a simple flexible rule. Choose from several different measuring ratios, such as, 5/2, 4/2, 2/2, and a basic 1/1. I paired most of these with the option to have a 1" scale on the reverse side.

Hope this makes your shop life a little easier. BTW I decided to make this after weaving a CH25 pair that I recently made. I will post some photos on that since I know many have questions on how it is done.

CLICK HERE TO GO TO THE DOWNLOAD PAGE. (Click on the download button in the upper right corner of the new page to begin download.) NOTE: THE DOCUMENT IN THE LINK DISPLAYS INCORRECTLY BUT THE DOWNLOADED IS JUST FINE. 

NOTE: The plans are in PDF format. If you don't have a PDF reader Adobe Acrobat is a free software that will make it viewable and printable. Make sure where ever you print it that the "scale" is set to 100% or the measurements won't be accurate on the print. You may need to unselect "fit to page" when printing.

If I made any errors anywhere in the plans please let me know so I can update them.


Skew Chisel Sharpening- The Critical Geometry

$
0
0
Do you love to turn but have a panic attack when you pick up the skew chisel? I think this is the most feared tool for a new turner. They buy a set of tools and start turning. Everything is so so with a few successes and a few mishaps. Then they go to sharpen the tools. Doing this for each tool is a bit confusing for the beginner to say the least. There are a great many sources out there nowadays to get you going in the right direction... except maybe when it comes to the skew.

Why do I say that? To me it is mind boggling that with all the discussion about the different angles to sharpen the edge at in relation to this and that and blah blah blah... The most critical part is always left out. DON'T ROUND OVER THE CUTTING EDGE. Maybe I should say that louder. 

What I mean is that it doesn't matter squat what all that other stuff is if your cutting edge is dubbed over. That is to say that their is not a straight line between the bevel and the cutting edge. It must not be sharpened with a rounded edge like you might see on a carving tool. Why? The skew is a simple tool to cut with on the lathe and requires one key to its successful use and that is you must have the bevel in contact with the turning to support the cutting edge while cutting. If you don't then the tool will catch. 

If your edge is rounded over then when you place the bevel against the turning the cutting edge will not be able to make contact with the turning forcing you to lift off the bevel to engage the cutting edge. When you do this you WILL catch. 

Often a related problem to this is not having a rounded edge from improper sharpening but simply a dull edge. A dull edge is another way of saying that your edge is rounded over. Keep your edge sharp and avoid catches

Also it is important to create a smooth arch to the edge. Not one that has transitions from one area to the next which will make problem prone areas for catching since you will tend to rock from one area of the edge to another while trying to keep the edge cutting. This rocking or shifting that you do while trying to keep the tool cutting lends itself to making you lift off the bevel and catch. 

So here are a few photos of what your edge should look like. Don't focus on the angles of anything but look at how the grooves left by the grinder are smooth and don't transition but create one smooth arch across the bevel. 


Notice that when everything is in one plane the light reflects off the edge consistentaly.


One way to help keep your grind smooth is to "bell" or round the face of your grinding wheel and ride across that high spot. Notice the darker area on the wheel in the background. It is the high shot. I am not trying to sharpen across the whole face of the wheel which would give me way too much area to worry about controlling. This gives me a small area to concentrate on while sharpening. I have no use for a 1" wheel as you might guess.


Now with a nice bevel, it is on to a few passes over my 8000 grit water stone and I will have a gleaming edge. Sounds easy. This is the part where you can round over the edge quickly. It is imperative that you keep the bevel against the stone while honing the edge. Firm (but not grinding) pressure should be applied while evenly and smoothly sharpening from heel to toe and back. 

I admit that is not a great description of how to actually do the honing but fortunately someone (Pete Galbert) made a video a good while back that demonstrates this part quite well. More people should be watching it but unfortunately they are probably learning how to do this from a woodworking writer not a professional maker. (The cynic in me coming out.)

Finally, notice again, that the reflection of light is even across its edge. Once you have removed the grinding wheel marks I stop here and go the lathe. I will return every turning to make a few passes to keep me sharp and catch free.

By the way it is nice to have a bench stone holder like the one pictured to have it up nice and high so you can hone with more control. 


Ahh... The Perfect Summer Day On Repeat

$
0
0
So, I have finally got my first batch of beech plane blanks out of the kiln. I have dried steambent wood parts in my small light bulb kiln for chairmaking for quite some time now. That is a whole different process really than when drying wood blanks to make wooden plane bodies.


What is my aim when drying wood for plane blanks? Well, with a background in working greenwood I always have appreciated how wood works that has been air dried. It is just different. I don't want to over rate it but the way the tools cut it is just different. As you can imagine I prefer it to the super dried stuff.


The difference lies in the fact that air dried wood never gets to a high temp like typical kiln dried wood. In the kiln the temp will generally get to the 160˚ range for many woods and some are higher. This is often done just to be safe and kill bugs or to set pitch in resinous woods like pine and to get the wood dried to a very low moisture content. However, it isn't actually necessary to heat wood this hot to dry it.

It is important to appreciate that commercial kiln operators are concerned with speed since this affects profits. Not knocking this, they are businesses, after all. However, the resulting product is not as good as it could be for the artisan woodworker. I have been completely sickened at times to have bought a wood like white oak that was beautiful wide boards and paid premium prices to only find that 30-40% was a waste because of drying defects hidden within the wood.

Anyway, these sorts of things, among the fact that I couldn't find certain wood cut and dried in the orientation or sizes that I wanted, lead me into the kiln drying business. ...for myself of course.

So I started researching this about a year ago and decided to go with a low temp dehumidification kiln. It basically allows me to control the environment in a closed chamber. Imagine wood drying on a perfect summer day at the optimal range of temperature and humidity for that wood. Now recreate that day over and over until that wood is dry. That is what this kind of kiln allows me to do. The blanks I am drying never get over 105˚ or below an average moisture content (MC) of 10 percent.

Yes this can take longer than a high temp (HT) commercial kiln but not very much longer. For most hardwoods it can be dried just as fast. In fact since I am not super drying the wood to, say, 6-8% MC (because these will be used in a open shop environment) then I don't have to dry as long. An advantage is that a low temp dehumidification kiln uses way less power than conventional kilns. Mine can run 100% of the time for 30 days for around $53. Of course, high tech kilns like this are not cheap to begin with. Think hybrid electric cars, you pay up front to get low operating cost.

I think this is the best of both worlds. After all there are drawbacks to air drying lumber. Air drying can take several years, first off. It is also subject to a lot of drying defects in actuality since you can't control the weather, as we all know. Surface checks are very common in air dried wood and then there are woods that are very susceptible to stain from mold and fungus if not dried quickly enough or cut in the "wrong" season. Beech is one of the worst for both surface checks and fungus stain when air dried.

Here are a few pictures from the process. I wish I had some of the log getting cut up a Curtis' place. Thanks again Curtis for letting me use your yard!


Haul it...


...cut it...


...stack it...


...load it...


...check it...


...start making it...


...finish making it...


...use it... (nice hair!)


...stack it... Wait, didn't I already say that?


Comb Back Arm Chair Seat Carving Photo Series

$
0
0
That title is a mouthful. It is that simple. I have been saving up gobs of photos from shop projects. It seems I am really good at taking photos but very poor at blogging them. Maybe, I should be on Instagram instead. Nay... I like to ramble.

Anyhow, these are a series of photos I took in Curtis Buchanan's shop while I did my research on the drawings for his chair plans I drew. I think the photos are pretty self explanatory so I won't go into detail to much. Others that are better at explaining it than me have already done so but I find that lots of pictures really help in seeing all the angles. Hope you like these.


Lay out the pattern, drill leg holes, arm support, center spindle and a few practice holes on the edge. (Was a different bit than I was familiar with :) )


Fit legs.


Adze work and carve gutter.


Bandsaw front profile and Inshave work.


Layout outside edge of seat.


Front view of layout.


Remove bulk with drawknife @ front vise. Use a wide one so your handles have more clearance for those slicing/skewed cuts.


Some more angles.


Refine with travisher. Use inshave to work concave area near gutter at arm post. Also some initial spoke shave work


Block plane down from front of pommel towards depth of seat. Redraw center line for reference.


Refine pommel with travisher and spoke shave seat front.


Two more views.


Layout seat bottom.


Drawknife front bottom edge and follow with spoke shave. Give it a slight convexed edge about the last 1/2 inch back.


Layout seat side and drawknife only. Ok you can use a spokeshave or other if you must. I won't judge. :)


Sorry I don't have step by step photos of this part. I don't like to stop when I get going. Lots of focus to do this right with the drawknife only. Lots of skewed slicing cuts here. Have a very sharp knife. If you have two drawknives you might leave one shaped and sharpened for just this task.


Shape back edge in two steps (refer to layout photo above) with drawknife and follow with spoke shave to blend.


Another view. Don't forget to chamfer the back top edge of the seat with drawknife. I forgot to take a photo.


Bottom view complete.


Another view.


Finish up top of seat only with scrapers followed by 180 grit paper. Raise grain and lightly sand with 220. Now leg it up!

Hope that was informative. By the way this is in eastern white pine from one solid board. That makes it so much easier to shape.


The Coffin Shaped Smoother- Up Close

$
0
0
Have you tried making that smoother from the plans that I posted up recently? Need a little help or a closer look? Well, here it is.

I put together two videos to show its details and how it performs in that order below.


I really love this little smoothing plane. I hope you make one. It will become a go to plane as it has for me.

I will eventually offer these for sale as well if you don't have the time or the desire to make one yourself. I understand that making a tool is not everyones interest but the using of it is. Let me know if you want more information.

Enjoy!

The Coffin Shaped Smoother- Up Close- Part 2

$
0
0
I don't know about you but videos are excellent to get the feel of something but to study something you want to make, pictures are it. 

I tried to include a few angles that showed off some of the different parts, both assembled and disassembled. I threw in a few artsy shots, I can't help myself.


Notice the iron is only heat treated at the end. I never bother trying to do the whole thing. It would take you a very long time to work past this end part in use, anyway. Japanese blades are usually laminated with steel, good for cutting blades, only at the end. So there you have it. I don't know what other planemakers do.


The secret to that curving chamfer down the side is to use a drawknife. No planing down a curve here. Spoke shave would work too but I like to go right at it. Plus I already have the drawknife out for making the coffin shape and rounding the heel. Thats right, no band sawing on these parts. I want to be dead on and I would have to clean up the bandsaw marks with something anyway. Probably the chairmaker in me. The drawknife is always in the hand.


Seeing into the mouth should help demystify that part a little.


Make your vertical chamfers with a chisel and #5 sweep gouge.

If you noticed the growth rings, I broke the rule here of putting the bark side of the wood to the sole. I don't hold to that religiously. If the pith side has a flatter growth ring shape then I will use that side. The more parallel the rays are to each other the less change in shape that area will experience. 

Maybe I will post sometime about how beech grows to explain why that happens. I also have other theories as to why for practical reasons the bark side was usually used. Thats for another time.


Here is a little perspective in use.

I can't remember the last time I wanting to make something this much, just so I can use my new tool. Ok, I will stop blabbing. 

Have fun in the shop!


Beech Wood for Planemaking - UPDATE!

$
0
0
Have you ever hear of over promising and under delivering. Guilty as charged.

Several months ago I offered to sell beech blanks for those that have been looking for some to make moulding planes. I unfortunately have yet to deliver on that offer. I have a number of readers that I presume are still waiting on me. Sorry!

Well thanks to Doug Moulder (a blog reader) I have an out. He found a good supplier in Ohio. The beech supplier regularly (according to him) supplies makers such as Matt Bickford with their plane stock. I wanted to pass on his information to those that are in need. I can't vouch for any of his material but he does have 100% positive feedback on eBay since 1998 and Doug Moulder made some nice planes from his stock.

Mike is his name and his number is 740-310-3984. He goes by user name Logbuyer on eBay. If you have used his wood and made planes from it please feel free to leave your feedback in the comments section below.

I really hope this helps anyone that is trying to get some wood to make a few planes. By the way his current prices are better than I would have been able to offer.

Happy making!

Comic Relief

$
0
0
Well, it has been about six months since I left good ol' Texas. Their are a few things that I don't miss but there are a few things that I do.

I came to really like the Mexican and hispanic communities and peoples their. There was always such an nice family atmosphere that was welcoming. Even when my neighbors sometimes had a big party with Mexican music, it always sounded like they were having a great time and no problems. I never listened to it myself but I miss the Mexican music that seemed to be so common around me. Didn't know it was missing until it wasn't there.

Anyways, nostalgia has gotten me. With that in mind I wanted to share one of the funniest Youtubers out there. He is a fellow in Mexico that shows off and demonstrates his Lie-Nielsen tools at work. I still haven't figured out if this guy is for real or just playing it up a bit. I think it is legitimate. Whatever the case it makes me laugh and reminds me of the good about Texas.

Enjoy!


Free Snipes Bill Plane Plans

$
0
0
So here is another addition to the plan files you can download, thanks to Doug Moulder. I had been saying that I would draw up some more plans but Doug beat me to it and so I asked if he minded if I could share them here with everyone else.


I have not made a plane based on these drawings. I have only briefly looked them over but everything seems to be on the money. As always with these things, if you find an error send some feedback so it can be corrected.

On to making more planes!

Here is the link to download. Click on the download button on the new page to start downloading. They are in a PDF file format.


Make A Pair Of Wooden Side Round Planes

$
0
0
That title is intended to be an imperative. What? Never mind, just make a pair and you will begin to see your moulding designs really open up and take new shape, literally.

I have found myself using these in many other places than what they were, I am sure, originally intended for. I won't spoil it for you. Do some exploring. For my own personal use I would choose a pair of these over a pair of snipe's bill planes, if I had to make a choice.

I have had a few inquires about these planes and rather than answer the same questions over again I decided I should get my tail in gear and pump out these for everyone.


These plans show a single right hand version of a 1/2" radius side round. Just mirror the drawings for the left hand plane. There is a view of the left side and the right side of the same plane so that the escapement and shoulder details are more easily understood as to there location. So don't be confused. I split up some of the toe views so as not to over crowd the details and for clarity. When I have some time I will actually put up some photos of the details, as well.

I figure it is about time that I mention this... I have not received any special training in making planes. I have spent much time researching through photos, books, instructional DVDs, and historical documents to come up with the methods for making the planes I do. What I mean is, I am not an expert. So feel free to stray from the plans I provide. There is a fair bit of room for originality. There are some things that should stay the same but by making some you will begin to find your style, if you want one.

Along those lines, I have pictured (in the past on this blog) some side rounds that I place the escapement on the opposite side to what is shown in these plans. They both work but as you can see in the plans I do it differently now. It makes everything line up better in the layout and is also a bit more practical for shaving ejection.

If you want to post these anywhere else online please link back to this page/ post. I offer these as a free download but they are not intended for commercial use. Again please limit the use of this design to your personal use and please don't be silly and try to sell them on Ebay. It is FREE! and it is © copy right protected.

CLICK HERE TO GO TO THE DOWNLOAD PAGE. (Click on the download button in the upper right corner of the new page to begin download.)

NOTE: The plans are in PDF format. If you don't have a PDF reader Adobe Acrobat is a free software that will make it viewable and printable. 

You do not have to print these to scale but if you do the plans are sized for 17" x 22" paper. Keep this in mind if you go to the print store. Check the print by measuring the 1" square scale. Do this at the print shop because they often mess up.

If I made any errors anywhere in the plans please let me know so I can update them.

Making the CH25 - Designed by Hans Wegner

$
0
0

Sometimes I feel like I am resurrecting the dead or at least recreating Jurassic Park. The paleontology of furniture. Digging up bones (pictures). Sifting through the dirt and debris (more photos- hopefully closeups or bottoms side shots).


When you are hoping to make a piece that you have never seen and not too many people have either and to top it off any technical information on them is no doubt buried in some website only in Danish is challenging, to say the least. I fortunately have gained the knack for obtaining at least one or two dimensions and working from pictures after that to the final dimensions of the entire piece with success.


Critical in making this project come together was determining the exact diameter of Danish cord. If you saw my ruler for weaving danish cord post then you know why this was so problematic. Once I figured this part out I had to find photos that showed exactly the number of cords on each portion of the chair. This took me about a year looking at photos that would pop up online. Thanks to an online auction, I stumbled upon some good close ups where I could count each cord. Put that info together with the dimensions and that finally completed the missing details I had been looking for.


Fortunately, Wegner was a craftsman, so his designs follow a logic that a woodworker can see at its core. You can see an underlying structure that is logical in the wood choice. How he utilized standardized lumber dimensions to derive the different parts for proportion and joinery. It is amazing the efficiency of the lay out of parts for production. I have learned after making several of his designs that there is practically no room for improvement. That is why you see so many "modern" chair designs that have his chairs at the core. Though, in truth, Wegner took many of his designs from chairs of antiquity. How about his wish bone chair that is essentially derived from a Quan Yi ceremonial chair (Chinese). I digress...


I know everyone wants to know. How to weave that back? What is that hole in the top of the rail for? Do you use cord nails in the back? No. I can answer that for you. The rest will have to wait for another post. And, YES, this chair is really "that" comfortable. Oh and finally, NO, you have absolutely no need for an ottoman.

Weaving Hans Wegner's CH25 - Photo Series

$
0
0
So here it is. I know that this is an often searched for and requested topic when it comes to weaving Danish furniture. I have seen the forum topics myself from several years back while trying to acquire the details on the subject. As with many of these things I decided maybe I just need to be the one to figure it out and share it.


So, here are a lot of photos showing the basic bones of the process. This is not a "how to" or a "step by step" but it will get you the basis if you examine the what and where and what order I am on, etc. I would like to give a more thorough explanation but due to time this will have to be it for now. Hope it helps some.

Oh and thanks to my wife for coming down and shooting some photos, otherwise I wouldn't have the seat weaving part. I shot the back portion, thus no me in the pictures.


Weave the front and rear rails as you would a Danish cord pattern of this sort. I hate saying that because there is no proper instruction on how to do this correctly out there. There is a way to wrap the rails while working from the roll rather than taking a bundle and going around and around the rail but I have never seen anyone explain it. I will at some point but for now wrap the front and rear rails and string the cord from front to back as you know how. Then work the weave left to right.


Work the cord over and under and pull through. By the way I have seen instruction that say the initial front to back weave is to be left loose. WRONG. It must be pulled tight. Not tight like a guitar string but definitely not intentionally left loose. The left to right weave is left just loose enough to make a nice up and down wave pattern through the initial front to back cord. If the left to right pattern it is pulled too tightly then it will not pack in neatly.


The return weave is wrapped around a steel bar that runs from front to back. Notice the steel wire that goes between the bars to keep them from bowing and keeps the tension balanced across the seat weave. This is critical that you don't use cord nails here instead. They will cause the outer rails to twist and eventually, very likely, split out somewhere or at least compromise the structural integrity.


Another bottom view for clarity.


There are slots in the rails for cord to go around where joinery would interfere with the cord. This is a block glued on to create space for the cord to go around the arm joint. Notice the cord areas are recessed so that the cord ends up just proud of the surrounding wood surfaces.


Start by weaving the vertical portion. This is the part that is a secrete and I can't reveal. Just kidding! The bottom rail of the back is wrapped first while leaving spaces for the vertical cord to fall in when the top is being wrapped. The top rail is then wrapped with a single cord and then drops down to form the vertical lengths at the appropriate spacing. The hole in the top of the rail allows you to form a wide band of cord on the back of the seat while maintaining the pattern on the front. Why you ask? Ok, lots of speculation on this but the answer is simple. You need a place to hide your knots when doing the left to right weave.


Here are some photos of everything all done up. 


Now all you need to do is install the arms and legs without getting glue on any of that cord. Yikes! Don't fret just use some blue painters tape around that area. Oh and make sure and do the finish before the weave, of course.


Now I have on the chopping block a set of four "Round" chairs (aka "The Chair") to do. Can't wait to get to them!


Fun With Raised Door Panel Planes At Woodworking In America

$
0
0
So I am gearing up to be at the Woodworking In America Show in a couple of weeks. It has been a funny back and forth game. Am I going, am I not? I rented a booth about six months ago and then canceled it when I realized with all the work I had on my plate there was no way I would have time to prepare what I wanted to present, which was planes.

Well wouldn't you know it, Peter Galbert calls me and has space in his double booth for me if I want to use it. OK, I say, I will go if you twist my arm. If he only knew I was secretly planning on showing up, be a party crasher, and hang out in his booth uninvited. I knew he would be too embarrassed to tell me to go home. OK, maybe that is not true, but I obviously have wanted to go this year and looks like I will.

So I won't have all the planes ready that I want to show off. In fact, I will probably only have two sets of planes for sale since I am so ill prepared but if you have wanted to try out some traditional 18th century style planes then here is your chance. I will have some moulding planes (hollows, rounds, custom profiles) and bench planes on hand.


With that said I wanted to show off a plane for making raised door panels. It features a skewed blade for making really smooth cross grain cuts without splintering. I was inspired to make this plane after seeing it in use on The Woodwright's Shop with Roy Underhill episode 3209 of the 2012-13 season. Go to the 21:30 minute mark and you will see his in use. I think he says this is circa 1830 plane that he is using.


On the fly, I threw together two videos of the plane making the long grain and the cross grain cuts. I didn't plan this video so, as you can see, I didn't make the cross grain cuts first as you actually do in making a real door panel but this gives you an idea of how it looks in action. I am cutting this in walnut so you can imagine how nice this will cut everything else. Hope you like them!


Long grain cut.


Cross grain cut.


Cyma Recta / Reversa Ogee Moulding Plane Demonstration

$
0
0
Here is another complex profile moulding plane that I wanted to share. It really is fun to use. I just love making a new plane like this.


This plane is aimed at making primarily a cyma recta profile. That is the ends of the "S" of the profile are horizontal while a cyma reversa has the ends of the "S" being vertical. Just think reVersa for vertical. This plane can make the cyma reversa profile if you stand the board vertically while working the edge. You just have to stop it at the right depth on your own rather than using the depth stop.


Here is a video of it in action. Enjoy!


Viewing all 123 articles
Browse latest View live