Quantcast
Channel: Caleb James Chairmaker Planemaker
Viewing all 123 articles
Browse latest View live

New Plane Stamp by Blacksmith Peter Ross

$
0
0
If you have been keeping up with the blog then you may have noticed that I don't stamp the toe of my planes. I have had a custom stamp for my furniture for a long time but my planes have gone nameless. I wanted something that was authentic to stamp my planes. Now I have it!


I asked Peter Ross if he would be willing to make me a plane stamp just like blacksmiths made for planemakers a couple hundred years ago. If you aren't familiar with Peter Ross then you may remember him from Roy Underhill's show The Woodwright's Shop. He is a regular and makes historical tools the way they were made originally.


I am so glad he agreed to make me one. I am so pleased with the results of my stamp. It is better than I could have hoped for. Just look at the results. I think this has added a true authentic feel that matches all the work I try to impart into the planes I make.


 Jack plane


Smoother and Jointer. Right is freshly oiled while the left is an older plane. Both beech of course.

Now, I am ready for Woodworking in America. See you there!

How to Drill the Mortise on a Moulding / Molding Plane

$
0
0
That title should probably be "What to use to drill a mortise on a moulding plane" but the "how to" must start out with the right tool. The wide mortises are easy. There are several different options to choose from in a typical shop but what about those really narrow mortises. Like the number one to four sizes. Basically anything 3/16" and under.

I have done the gimlet bit thing. They are great if you can first of all find the narrow ones and they are not all beat up and crooked and dull. That is difficult to find and I never found a narrow one that cut correctly as is. If you do find them they have many times been attempted to be cleaned up to make look nice for sale on eBay and thus dulled even further or someone tried to sharpen them and might as well have ruined it. I wish they were easy to sharpen but it is about as hard to sharpen as is sharpening a spoon bit. Once they are messed with too much in the wrong way then it is a nightmare to get them back to right. Well, at least it is for me.

So now that I have scared you off from trying to drill your mortise with a gimlet (sorry) let me tell you what I use.


I stumbled upon these little auger bits made in Japan by Star-M. They are a real jewel. Unlike a gimlet bit you don't have to constantly remove them from the hole to clear the shavings expect right near the very end. They cut through at the bottom cleanly. Once you get them tracking straight they will keep on that path. That is a plus but also a downside where as the gimlet lets you steer them if you need to correct your path. But on the other hand that is the downside to a gimlet. You have to constantly keep them on course. They tend to drift if left to their own. They also will over heat easily and dull or even suddenly break off in the mortise which has happened to me. Ouch!


Ok so where to buy these little guys. I bought mine from a supplier in Germany. www.fine-tools.com. They are reasonably price but the shipping is costly, as you would expect. They sell a small bit brace that fits the hex shanked bits that I use. It is decent but I am going to make one eventually that is more suited to me. Of course you can use your standard two jaw brace and use an adapter or these bits can be used in a power drill, according to the manufacturer. I have not tried this myself.

I use the 3mm for the smallest wedges, the 4mm and 5mm for most everything else. If I had to suggest one it would be the 4mm since it tends to be one that I use the most.

Hope that helps you out in making those narrow mortises!

8 Things To Like About A Wooden Bench Plane

$
0
0
No. 1.  They are light and quick. But you say "You need that mass.". Bologna (no offense bologna I like you).  What goes forward must come back. That reminds me, my back feels a lot better using a wooden bench plane. I find I almost rock back and forth now instead of lunge and drag it back. I mean lift it not drag it. You will create a wear bevel on that back edge and mess up your clearance angle if you aren't careful. Now do you want that weight? I am guessing if you want more weight behind your plane then have some more desert.

No. 2.  A blade that never shifts in use. I heard this surprise reaction over and over this last week at Woodworking In America while people tried out the wooden bench planes. I thought I was the only one that had this issue with the metal planes. I just really cranked down the lever cap to keep it in place and then it was so tight that the lateral blade adjustment lever was hard to make fine adjustments. I end up using a hammer for fine adjustments just like on a wooden plane.

No. 3.  Fast blade removal and no cap iron to remove/reinstall for sharpening. This equals back to work faster coming and going. That takes me to no. 4.

No. 4.  Never fearing I will strike my perfectly sharpened blade on the metal mouth while reinstalling the blade. I know I am not the only person that this pains.

No. 5.  The ultimate feedback due to a solid connection the handle has to the body. Unlike a metal plane that has a bolted on handle that shifts in use, loosens because of use and, slight moisture changes a wooden plane telegraphs every subtle surface interaction with the cutting edge back to your hand. No need to see tear out, you know it when you feel it and intuitively begin to adjust your planing like the blind reading braille. Beautiful really.

No. 6.  Never worrying about if you remembered to rub your plane down with oil so that it doesn't rust between uses.

No. 7.  A lighter tool chest. Multiply that by every other wooden plane you have. Is your back feeling even better?

No. 8.  Your Roubo bench no longer calls you a hypocrite. :) Ok that is funny admit it.

No offense to metal planes or there users. I have plenty of metal planes and they definitely find use in my shop. I have to say that wooden planes are hands down just more enjoyable to use. To me anyway.

Peter Galbert Drawsharp - Tool Review

$
0
0

I should start off by making it clear, if you don't read my blog, that I am friends with Pete and this could be easily categorized as a biased review. I realize this but I am a chairmaker so here is my opinion. In fact it is probably just as much about my thoughts on sharpening in general.

If you haven't already seen the videos Peter has posted on how this works in use then I recommend checking them out to get the concept. UPDATE: Pete put up a post talking about why he designed this tool. Check it out here.


So is the Drawsharp just another sharpening jig? At first that is how I was looking at it. I guess it is. But I was thinking about how a turner uses jigs to rest there tools on supports to grind the edge or hold the tool in some other way while sharpening. I use jigs in these instances because they make my sharpening retain or achieve the shape I want as well as get there quickly without worrying about achieving a cutting geometry that is crucial to good turning. On the other hand, unless I see a real advantage, I am just too focused on what I am making to fuss with a jig, whatever it is, unless I see that it actually makes my work faster, better, or lessens the interruption of my craft which I think is hugely important. I sharpen all my plane irons by hand for this reason though I can see someone arguing for using a jig to do this faster but they just seem to irritate me.

What do I think of the Drawsharp? Is it a faster, slower or just a more accurate way of sharpening? Before I answer that I should say that I think this tool has two distinct tasks it can accomplish. First it would help you rehab a drawknife that is in the typical shape when found at a flea market or the like. Essentially the edge is very beat up. If you don't want to attempt doing all the clean up on a grinder then this is a far less intimidating way to get it to functioning and I think it may in some ways be just as quick if not possibly quicker. This of course really has more to do with the current condition of the drawknife.

My drawknives are in fine shape so I can't really comment on this process or the speed other than messing around with a few beat up drawknives at Peter's booth at Woodworking In America, the show these debuted at. It was quick, I must admit. It was simple for the first time user which would be the main reason I see some one like that using it. I came to realize it is much cheaper to rehab 3 flee market drawknives even considering the purchase of the Drawsharp than it is to buy a decent new drawknife which then still leaves you with only one drawknife and the standard method of sharpening it. A few different drawknives in chair making is useful if not necessary.

That takes me to the second task this accomplishes and the one I think makes it really most useful to me. It maintains the edge of the knife consistently and without fuss. For instance it takes me about 8 minutes to set up and resharpen my knife and get back to work with my traditional method which is a jig that holds my sharpening stone in an elevated position above my bench. However, the Drawsharp allows me to never even leave my shave horse to get my edge back up to full throttle. It seems to take me about 45 seconds once it is in my hand to be satisfied with the edge especially since maintaining it is so easy I don't even think to not just do it once I get the notion it is approaching dull.

In the end I would say that two types of people would be suited to the Drawsharp the best. The first is if you want to rehab a knife or knives and don't feel comfortable with the grinder for this task. I don't blame you since it is tricky.

Second is the person that does a lot of drawknife work and the down time this saves out weighs the cost of the tool or you simply do this for a hobby and your free time in the shop is of more value than the cost of the tool.

So if you don't mind rehabbing your drawknife with a grinder or you have enough time in your craft to sharpen the old way or enjoy this method of sharpening then you can pass on this tool.

Hope that helped anyone who was trying to decide if this tool was right for them.

Final disclaimer- I do not profit from the sale of this tool.

Danish Modern Chair Joinery - Using the Slot Mortiser

$
0
0
I know that when you look at a Danish modern chair there are a few kinds of joints that we are not familiar with in our western chair making. The rectilinear cylindrical shaped cross rails as well as multiple rails entering at the same height 90˚ to each other on a relatively small post. I think the only perspective most of us have is what Sam Maloof did with some of his chairs when joining the arm rest to the front leg post. Though that is not the joint I will be discussing now. I think it is no coincidence, by the way, that his chairs reflect the Danish design movements considering he made his chairs during the period of the mass production of Wegner and in particular Møller chairs. 

Since I mentioned Sam Maloof then I think something I recently read about him in the Los Angeles Times said with regard to his thinking about sharing his knowledge that I can completely agree with and reflects my thinking as to what motivates my blogging. It is a paraphrase of something he said- "'He didn't believe in keeping trade secrets and was eager to share knowledge earned through trial and error to save what he called "a struggling craftsman" hours of frustration.'" Hopefully this post saves you some time.


So here is how I cut the joints for a rectilinear cylindrical cross rails ( Not sure if that is the right way to describe that shape?).  I think a video is appropriate to show this. This blog post is a long time in coming as I did this video about two years ago and it just sat on my computer until now. This is a leg for my Elbow inspired chair but is the same for any other chair of this type. Notice how I use my angle gage to orient my leg to the angle that I want to mortise my rail in relation to my rung mortise.


This is not how the joint is made in the factory. I didn't know this when I started making Wegner chairs. The factory chair have a specialty shaped shaper that cuts a tenon that is narrower than the rail and it leaves a shoulder that conforms to the shape of the leg. It is great because it leaves more material for the post and it also simplifies assembly. The method I use lets me be more flexable in my design because I can change the designs without worrying about getting a new custom shaped cutter head. If I were doing mass production then that would be a different story. The drawback in my method requires that a joint without a shoulder be cut exactly dead on otherwise there will be a gap in the joint. The assembly is also a bit more tedious. Maybe I will change someday but it is how I like to work for now.


Here is a video that I found on You Tube that shows some of the joinery being made at the factory producing some Wegner chairs. It gives some great insights to their processes and the "shop made" type jigs they use. It is pretty cool. There is some unique tooling I have never seen before. Click here to go straight to the joinery part of the video discussed or I encourage you to watch the whole video below.


The joint for the weaving rungs are cut in a similar way in the factory produced Wegner pieces. This makes the angle of the rung set exactly during assembly. However, I simply use a round mortise and tenon and set the angle during assembly.


I will follow with a discussion on how to make the joints for rails that meet at the same height on a post 90˚ to one another.


Enjoy!


Free Wooden Jack Plane Plans - 18th Century Style

$
0
0
So in my continuing effort to confound people as to how I make my living giving everything I know away in my spare time here is more plans to print and hopefully make something with. (Download link is at bottom of page)

Wooden Jack Plane Plans Image
I think this plane is just about my favorite. It is fun to just hog away at rough stock with this guy. Give it a heavy cambered blade and just see the shavings fly. If I could get someone to hold the camera for me I would demo this one in action but I am sure you can imagine.

The great thing about a wooden jack plane is that the sole doesn't have to be ultra flat to work really well. And this is probably the best wooden plane to start with because it is much easier to do a lot of physical rough work with this lighter plane than with a metal one. Once you use it you will understand what I mean.

Also cutting the mouth for a jack is easier since you would typically want it quite open. Cutting the mouth on a smoothing plane on the other hand requires a very tight opening and thus much more precision both for creating the mouth and floating the blade bed to keep the mouth narrow.

I hope to follow up with a cut away view of the inner workings of the mouth. Either a good drawing or an actual one made in wood with several pictures. Don't hold me to the fire on this one as for timing. I will get there eventually. :)

Take care all!

CLICK HERE TO GO TO THE DOWNLOAD PAGE. (Click on the download button in the upper right corner of the new page to begin download.) These are offered as a free download intended for non commercial / personal use only. These are copyright protected

NOTE: The plans are in PDF format. If you don't have a PDF reader Adobe Acrobat is a free software that will make it viewable and printable. 

You do not have to print these to scale but if you do the first page is sized for 11" x 17" paper. The second one is 8-1/2" x 11". Keep this in mind if you go to the print store. Check the print by measuring the 1" square scale. Do this at the print shop because they often mess up.

If I made any errors anywhere in the plans please let me know so I can update them.

Dark Side Of The Moon

$
0
0
I have been deep into completing some plans that have been in the works for about 8 months now. I have been dragging these out and am finally on the home stretch.

I know that many people have been asking Curtis Buchanan if he is going to put out the plans for his continuous arm chair and the answer is yes as soon as Caleb finishes them! So you can blame me on your having to wait so long. The fact that I have been slow to blog as of late is that I am trying desperately to get these finished in time for Curtis' You tube videos on making this chair are posted up.

We are making these extra special this time with a front and side view and we will see if we decide to fit the top view in as well. The plans will be large and detailed with all the turning patterns and bending forms just like before, only better.  These plans will really inspire you to make this chair and give you all the details that are so critical for this type of chair.

Here is a sneak peek.


How to Make the Mouth, Abutment & Wedge For A Wooden Bench Plane

$
0
0
The hardest part of a wooden bench plane to wrap your head around is with out a doubt also the soul and heart of the very plane itself. It is where all the good stuff happens. It is the parts you can't see but that matters the most.


No online picture of an antique bench plane would ever give you the details that you need to make the critical functioning parts. You would be too timid to probably dissemble one if you were to even happen upon the exact one you wanted to duplicate while at flee market or vintage tool shop.

Well no need to now. Even though this post won't go into step by step how to form all the critical parts at least you will see what they are supposed to look like which is half the battle, or more.

While in the process of making a demo plane for a post to show the inter workings (and I had actually already cut it in half in order to show off the inter workings) Doug Moulder came along and drew up my jack plane plans in a 3D model. Great work Doug! So there is a nice plane cut in two parts if anyone wants one. I may or may not get around to photo graphing it to show how the inter workings come together. Funny thing is that after all that I realized that I could have just cut the parts into the side of a block of wood without doing it the hard way and then cutting it in half. Sometimes I wonder...

Anyhow here is the good stuff you have been waiting for. Enjoy!


Also I have a real interesting project in the works. Tapered plane blades. More on that to come!


Tapered Bench Plane Blades for Traditional Wooden Planes

$
0
0
UPDATE:
Am I the last person to know about this? Lee Valley sells tapered plane blades! Check them out here. Ok so they are shorter than my bench plane blades. That is my only complaint. I really don't know where my head has been stuck. Does anyone know how long these have been for sale? I am currently slapping my forehead and doing back flips all at the same time. All I can do is laugh. Thanks to everyone who has emailed to inform me about these. :)

Original post:
So I have been working on getting some tapered wooden bench plane blades made. You may or may not be familiar with what I am talking about. If you have used a side escapement moulding plane then you are familiar with the tapered blades they have. Well this is no different really.

All the planes I have made up to this point are single iron planes, that is the plane blades have no cap iron, and I have made them with just a flat iron, without any taper. I know that you can make a very good plane with a flat iron but there are some things that are far better with a tapered iron.

Here is just a couple of reasons. One is that the blade is wedged more securely thus vertically eliminating the blade shifting while in use either side to side or backwards. This more secure fit really reduces and chatter that could result from less than ideal fit from normal seasonal wood movement. 

The biggest advantage I believe is that when the back of the blade is maintained flat during sharpening a taper toward the heel of the blade keeps the blade form actually becoming a taper toward the cutting edge on a flat blade since it is being reduced in thickness on that end.  This would of course result in a blade that shifts backwards in use and becoming loose. Along with that issues is that a flat blade seems to change position more when setting the wedge while a tapered one doesn’t. This seems contrary to what you might imagine. I could go on but I think you are probably seeing the value of a tapered blade so far.

While researching how to machine these blades and just before I was about to go on a buying spree for more tools (metal working stuff; milling machine, surface grinder, etc.) I met a retired machinist in his eighties that convinced me to let him produce them for me. I think I am glad that I agreed if not for the very fact I know they will be right the first time and that I can get the blades I want in a reasonable amount of time and on to making the planes I want to make. After all I am a woodworker first, the metal work is something I would like to learn but I need to stay focused as much as I can. After all the original blades for these antique 18th century planes would have been blacksmith made.


Speaking of that, I am basing the blades on the single iron plane blades that are shown in "The Tool Chest of Benjamin Seaton" 2nd Edition. They are from a british plane found in a tool chest from 1797. Thank you to blacksmith Peter Ross for getting me to the proper historically accurate blade design.

I want to thank Raney Nelson of Daedtoolworks for getting me on the right track for getting these machined in the correct fashion. That is to say the right machines and the right tooling.

Here are a few photos of the process and the results so far in our test material. I hope to have the actual blades cut, shaped and in my hands next week! Then they will be off for heat treating.


Stay tuned!

Sorry! My Bad

$
0
0
In my sincere effort to share what I thought was an out of print book from what seemed a legitimate online source I stupidly shared a link to an illegitimate website sharing a book that, yes, was out of print but the copy rights where still in effect. I contacted the publisher to discuss this and I confirmed this was the case. Something in hind sight I should have done before.

Please if you have the downloaded book I encourage you to please delete the file.

I spoke with Rene at Astragal Press (the publisher) and apologized for my naive assumption that it was out of copy right and no longer going to be reprinted thus allowing the website that I won't mention to distribute the book. My sincere apologies to everyone including the author for sharing the link to the site as I would never encourage anyone to infringe on a copy right.

On a positive note Rene said that even though they do not have an exact date to have the book reprinted they do have it in the works and it will again be at a reasonable price unlike what you see on sites that resell the used books. You can call and put your name on the list of those that are interested if you want an update when it gets ready for sale.

Again, I apologize.

NOTE: The original post was removed so as to stop any misdirected readers. I am attempting to remove that blog post from another site that reblogs my posts. Thanks for your patience while I try to extract my head from my rear.

Free Cyma Recta / Ogee Profile Moulding Plane Plans

$
0
0
Here is some plans I have had setting on the shelf and I finally got around to cleaning them up well enough to throw out here on the blog. Hope you like them.

This is a complex profile moulding plane featuring a 7/8" ogee profile just like I showed off in a prior post. It is a side escapement plane and is a very functional size. A 5/8" size is quite useful as well for general work. This should give you an idea of how to produce the other sizes if you follow the same principals of layout.


I highly recommend forming the profile of the sole before doing any of the other layout and cutting. It makes sure that the mouth is located at exactly the right spot. If you do it at the end then you may remove too much material getting the profile shape just right and then have a very wide mouth.

By the way I always cut the profile on a complex profile plane first whether it is a moulding plane or bench plane such as the raised panel bench plane. This is the opposite advice I recently saw in the article for the raised panel plane from Popular Woodworking. Try it both ways and you will see it results in a much better plane cutting the profile first.

CLICK HERE TO GO TO THE DOWNLOAD PAGE. (Click on the download button in the upper right corner of the new page to begin download.) These are offered as a free download intended for non commercial / personal use only. These are copyright protected. 

If I made any errors anywhere in the plans please let me know so I can update them.

Enjoy!


Lie-Nielsen Hand Tool Event - Charleston, SC - March 28-29th, 2014

$
0
0
Its official. I will be a guest demonstrator at the upcoming Lie-Nielsen Hand Tool Event in Charleston, SC on March 28th and 29th. It will be at the American College of the Building Arts.

I hope that anyone who has wanted to try out a traditional 18th century style hand plane will come on out and join in at the event. It should be fun and informative for all. 

Currently Christopher Schwarz and Mary May will be guess demonstrators as well at the event so the planes won't be the only reason to come out. I hope to learn a few techniques in carving from Mary. It has always been something I have admired and tried my hand at since a young age. I loved to carve wax and clay. I moved on to doing chip carving and some relief stuff later and then small figures but never got really serious about it.

I am happy that they have invited me to be a part of the event and will likely do another one or two this coming year as well. I will update everyone via the blog if and when that comes about.


Boxing for Wooden Moulding Planes

$
0
0
One hard thing to acquire when making a moulding plane is the material for boxing. For any of you that are not familiar with the term boxing it has to do with the wood that is inserted into high wear portions of the sole with a very hard wearing wood. The traditional wood was almost exclusively Boxwood (Buxus Sempervirens). The boxing wood is placed in such a way that it orients the end grain of the wood toward the sole of the plane. It is inserted on a bias to the sole that is parallel with the bed angle or the wear angle.

Moulding planes that would have this in particular are those with quirks of some sort that need a sharp area of a profile to project from the sole. Side bead planes are a good example of this. However, the sharp edge of a plane that receives high wear such as a rabbit or filister plane would commonly be boxed since its edge would be presented to the work repeatedly. At other times you may see the inside corner of a complex profile moulding plane's integrated fence being boxed since the fence would be pressed against the stock to keep the profile in position during the cut.

Cove with fence boxing and side bead with boxed quirk

Rabbit plane with persimmon boxed edge

So where can you get boxing wood? It is a real challenge. So I am going to help you identify some wood that is native to the US that you may be able to find that is appropriate for boxing. I am also going to share a source of Buxus Sempervirens that is sold here in the US currently.

First off is a native source that is the only North American tree in the Ebony family. It may be a surprise but it is Persimmon (Diospyros Virginiana). This wood is possibly in your backyard or neighboring forest and you didn't even know it. It often goes unnoticed because the forest grown trees may not bear fruit since they don't receive enough sunlight if they are in the understory growth with taller trees around. These trees often don't grow in groups and are sparsely populated in the forest. This could be due to an animal such as a deer eating the fruit and then the seed germinates wherever the droppings land. Generally I find the trees growing along the tree line to an open area or a path through the woods rather than out in the middle of the forest.

Here are some pictures of the most important way to identify the tree, the bark. You need to know what the bark looks like because very likely the tree that is big enough for you to cut down for lumber will be too tall to see the leaves well. The forest grown trees will be slim and tall with the foliage grouped near the top. Also the best time to cut most trees is during the winter months while the foliage is lost.

~9"ø Persimmon bark

This is the bark of a relatively small tree, about 9" in diameter. Just large enough to get usable wood. Notice the bark is a rusty red color where it is broken. This is a good way to confirm you have the right tree. 

~14"ø Persimmon bark

Now notice the bark if this much older Persimmon. It is much different. It looks more like a mosaic of plates of bark rather than ridges. This tree is about 14" in diameter by comparison.


This is a piece of persimmon lumber cut so that you can see the layers of bark. Notice that the layers alternate black to rusty red. The bark will break at the reddish layer. The layer that divides the bark and the inner wood is quite distinct as well.

Plain sawn Persimmon

This is the color of the wood that has been milled and air dried. It has taken on a light flesh tone color that will darken to a beautiful light brown tone when oiled.

Last, the supplier of Boxwood (Buxus Sempervirens) is Rare Woods USA. The owner is Rory though anyone one can help you that answers the phone. He is from South Africa and began importing exotic lumber to the US about five years ago. He is not new to the business since he worked with exotic lumber in South Africa for about 25+ years. I learned of his exceptional stock of woods from Tim Manney. Thanks Tim! He spoke well of Rory and after speaking to him myself I got the same vibe. He really knows his wood and very quickly understood what I was inquiring about. He does have a minimum order so please be aware of that. Currently it is $300+ shipping. This accounts for his valuable time in selecting the right boards that you may want. He also has quarter sawn European steamed beech for plane making up to 8/4. I encourage you to check out his video about his lumber on his home page. You will see what a unique place he has. If you buy from him please let me and others know your experience by posting in the comments below. I have not purchased anything from him but wanted to pass on the source.

Here are a few photos of some boxwood that I have. It was a very old tree by North American standards. It does grow here in the US but it is hard to come by in this size. You will mostly see it as very small hedges around homes, etc. I really love the smell of this wood. 


Tapered Bench Plane Blades Production Progress

$
0
0
So I have the blades back after machining and they look great. I just need to get these heat treated now. The larger ones are a bit too big to heat treat like I currently do my moulding plane blades which I do myself in-house. I want these to be heat treated without having to do a lot of flattening afterwards. 

I have a stamp designed for marking the blades. That will take some time to get but look forward to having that to complete the look. 

I stuck a blade in my trusty smoother that never leaves my bench top just to see how it will look. It looks great to me. What do you think?

Smoother with new blade

I am busy working away trying to get other things lined up for the Hand Tool Event in Charleston with Lie-Nielsen on March 28-29th. Also my website has been down for about a year now as I rework it. It is time to get that finished and back up and running. 

This computer keeps demanding my attention when all I want to do is be working in the shop. Back to normal soon enough.


What Planemaker Floats Do You Need For Making Wooden Moulding And Bench Planes?

$
0
0
Here's a question that comes up often. I think the question is which ones don't I need. Let me just show you which ones I think are pretty much necessary to make these planes. These don't cover skewed planes. That is a whole other monster.

I'll start with the moulding plane floats.


The two floats on the bottom are the side and then the edge float is the next up. You can't expect to make a proper wedge mortise without these two. I like the pull side float because I can go right up to the mouth and then work a slight hollow back from there without worrying about damaging the mouth trying to push up to it.

The two top ones are essentially a push cheek float and a custom modified push float. You don't need to modify one but the top one was my first float which was a large cheek float and I just customized it while experimenting and there it is now. It sort of falls between the function of a push side float and a small push cheek float. 

Anyways what you need them for is first off the small pull float is needed to bed the iron. That is, to smooth out the bed so that the iron fits firmly exactly where you want pressure exerted when wedged. Basically you are knocking down any high spots. Second the push float is needed to create the wear angle and size the mouth opening. A small push cheek float would work fine in place of my custom thingy. It needs to be a push float because you will break out the mouth if it where a pull. That would be a disaster for the function of your plane.

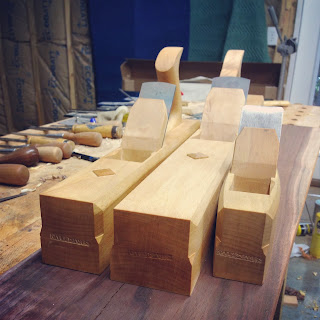
Now on to the bare essentials for the bench planes.


Starting at the bottom we have the bed float the edge float and yes my custom push float thingy. Again just substitute the small push cheek float. 

The bed float is of course for the blade bed and it is a push since you are working from the top unlike the moulding plane bed float (small pull cheek float) which is worked from the bottom of the plane. 

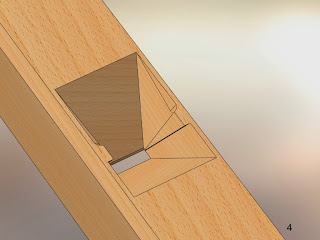
The edge float is so useful in making the openings in just about everywhere in the bench plane. Think of it as a saw that opens the mouth as well as cuts in to create the areas for the abutments to recess into body for the wedge mortise. No need to have a special saw for this as I have seen some suggest. And of course the edge float is used to make and adjust the angle of the abutments themselves. 

The push float is used to create the wear angle and does a lot of clean up work on the cheeks and some hollowing work in the wedge cheek areas.

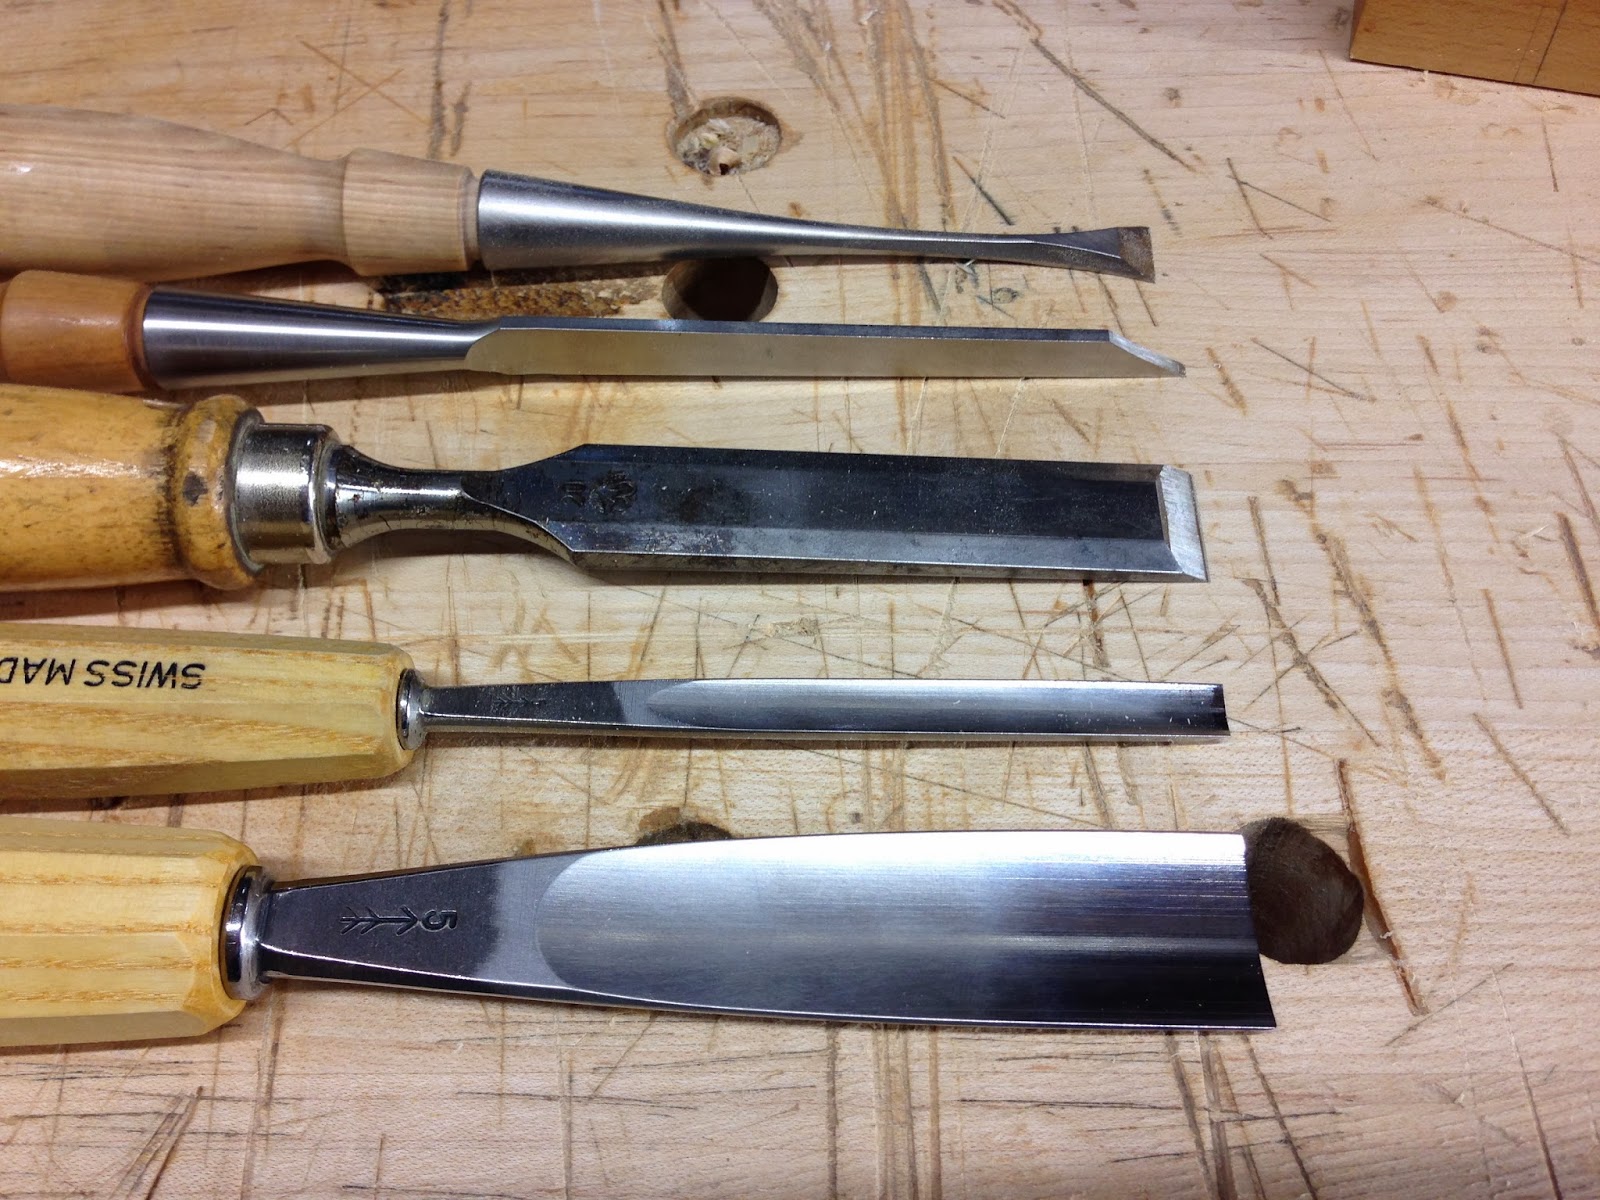
Here are the chisels that I think are a must.


These are used everywhere on both planes. If you wanted to you could do without the largest carving gouge.

The 1/10 mortise chisel is first on the mush have list since it is critical to getting into places that many other things simply won't go. The edge float can be made to do a lot of the work this thing takes care of but I would hate to be without it.

The chisels are essentially a 3/4" for all the chamfers and general work. Then a 1/2" or better yet a 3/8" works well for everything else. 

The gouges are used for shaping things. The rounded end on the plane are made with the large gouge, it could also be done with the 3/4" chisel if you don't mind the faceted look. 

The small #5 sweep is for the gouge cuts at the end of the vertical chamfers if you want the detail of the mid-atlantic planes from the 18th-19th century. This is the style you see on Old street tools planes and Matt Bickford. I like this style the best as well. I guess is suits our modern tastes. They tend to fell more Roman in form rather then Grecian. These details tend to be more early rather than later in platemaking history as well. I know more about planemaking than there history so I will stop here. 

One final note on floats. Don't expect the floats to function at any decent level the way they come from Lie-Nielsen. That isn't a dig. It just means you really need to sharpen them with a triangle file for them to work well. They basically sharpen like a saw be even easier. You just need to pay more attention to keeping the file cuts nice and consistent all the way across the teeth and you will be set... err well, sharp that is... no set needed.

Hope this is helpful!


Danish Modern Chair Joinery - Møller Style Joints

$
0
0
I got a little nudge to follow up on something I promised to talk more about which is how to do those joints in Danish furniture where the rails meet at the same height on a post of a chair leg.

From the first time I made these chair joints until now I have made them the same each time in designs that require this type of joint. I have not had one fail yet. Honestly I had wondered for a long time just how the factory made there joinery. Turns out it is the same. I discovered some photos of an antique one that was for sale and the joint had come apart and there was my answer. I don't think it takes a real genius to figure this out but it is nice to have confirmation when you see a factory example of it to confirm you aren't making substandard joinery.

So I will let the pictures speak for themselves especially since I am heading out of town for the weekend and my time is a bit crunched.

By the way I do cut the mortise on the slot mortiser. You could use a router as a substitute but couldn't make any recommendations on how to use one of those things.


Here is an example of an assembled joint from a Møller style bench. You can see the typical thicker portion of the post at the joint height. This helps add more meat to the joint and a shoulder surface for support of racking forces.

Below is how the joint intersects in the middle of the post. The mortises make an X if you viewed a cross section of the post. I place the rail that is shown vertically as the front to back rail and the horizontal as the left to right rail. This way the front and back rails "pin" the side rails in the mortise. I think of it as a sort of back up if the glue joints weaken. There is plenty of glue surface in these joints as well. Surprisingly strong.


Some additional views below.


Above is the joint before shaping. I carve off the corners and then finely rasp the surface to match the shape and thickness of a piece of cord.


I have found no faster way to round down the tenons to match a slotted mortise than a no.6 grain rasp. On that note I prefer round as opposed to square mortises here because I think the joint is less likely to split out when stresses are applied to the joint.

For reference the tenon is 3/8" thick by 1-7/8" high (I think?) and the post are 1-1/2" square at the joint. 

Give it a try and let me know what you think.

Continuous Arm Chair Plans - UPDATE

$
0
0

I just wanted to update everyone to let you know that the chair plans of Curtis Buchanan's continuous arm chair are almost ready. I have finished up my part of the technical drawings and we just need to get that fancy topographical map of the chair seat together. Someone else does that.


Curtis is working on a new website that will make it easier to make a purchase. I can't wait for the videos to start rolling out as well. They will be posted up on Youtube. This time he wanted to have the plans ready as he rolled out the videos so that you could build along if you wanted. Should be great.

There are some extra videos on some really important subjects that will be following as well. You will like them if you have ever needed help choosing a good log. He has tons of experience.

I'll update everyone when they go up on his site and the videos are up on Youtube. It should only be a few weeks from now!

1:2 Scale Front & Side View


Proof is in the Pudding - Wedging Tenons

$
0
0
My pudding is pistachio, what's yours? That makes no sense but that is what just came to me when I looked at my photos.

What am I talking about? Well an interesting little thing that I came upon when wedging through tenons has proven to be true and not just theoretical. I think it was about a year or two ago that Pete Galbert was talking about glueing only one side of a wedge when putting them in. I hadn't given it much thought as being anything ground breaking but once he started talking about it I realized that this was in fact what I had been doing and was significant to the longevity of chair joinery.

Why glue only one side of a wedge. I started doing it as I recall because I had heard about someone actually splitting the end of a tenon before assembling it with the mortise. I don't remember who it was. But the idea was that the tenon would have a weak area in it so that when the seasons changed the moisture content of the wood, thus expansion/contraction would happen, the stresses would simply spread the split in the tenon rather than break the glue joint.

So basically I figured that if you only glued one side of a wedge then the other side would serve as the weak part of the joint and spread rather than stress and break the glue joint. So here is the proof that it actually works. My house has been really dry. All my wood flooring has gaps between the boards and the humidity has been down around 10-20%. After coming from humid south east Texas this is all new to me.


Look at what the joints on my settee have done. One is the leg tenon coming through the seat. The other is the tenon coming through the handhold. One side of the wedge has opened up rather than there being a failed glue joint.
Very interesting, is it not.


By the way, I have been doing a lot of reading and editing of Pete's book that is due out this year. This post didn't start out as a way to plug Pete's book but I have to say that if this sort of stuff interests you then trust me you will love this book. It is packed with, among other things, little nuggets like this.

German Style Horned Smoother - In The Works

$
0
0
Not too long ago I had the pleasure of talking with Jeff Neil. He is a couple hour drive from me up in the Tennessee mountains. He coordinates speakers for a guild up his way. During our conversing he shared a bit of his passion about wooden planes.

He had written back in 07' an article for the Chronicle magazine, published by the Early American Industries Association in regard to the tool chest of John E. Kraus. This is a tool chess that he acquired. The chest dates form the 1870's and some of the tools may have come over from Europe, from which he immigrated, such as two horned planes.


So, a few months later after reading the article I couldn't seem to get these cool German style horned smoothing planes, that were in the collection, out of my head. Jeff was kind enough to take in depth photos and measurements of one of the planes so that I could copy it. Or at least have a working base to begin with. One of the two that he has appears to be a scrub type version. I am going to begin with the smoother though.

Here are a couple of photos that Jeff shared with me. If you can find the article online it is worth a read. I don't know if the one article is available anywhere but the entire 60 volumes of the magazine from the 1930's on is available for $15 here. If you like history of early American tools it is a very nice read.


I will show some of the progress and if I can get myself around to do it maybe some plans as well once I get the design down.


Continuous Arm Windsor Chair Plans Are Here

$
0
0
Ok if you haven't already gotten an email from Curtis Buchanan about his continuous arm chair plans being up on his website for sale then here is your notice. If you already know about them then this is just the snooze alarm going off. Wake up and go get your plans. If you want them that is.


Curtis and I spent about eight months getting these put together. They include the full scale turning patterns, bending forms, seat carving topography map as well as a front and side view in 1:2 scale. I think you will find that this takes these plans a step above the previous one. We considered full scale but then the plans just get to be impractical to use in the shop for reference. Plus I think this size looks kinda cool just hanging on the wall in the shop. Heck, maybe frame them as some shop art. That may be taking it too far but thats just me.

I have had about all I can take of sitting at the computer as of late. I can do technical drawings but I much prefer to make stuff. Though I do hope to get around and put together a small project for those that want something to try out in the Danish furniture vein of things. I do love my Danish modern furniture. It is where I started and probably won't ever venture completely away from it.

I hope you all are enjoying this awesome spring weather. Well I am. If you are not then I hope you do soon.

Take care all!


Viewing all 123 articles
Browse latest View live